The Google Consent Mode integration feature in the Consentik app enables merchants to implement Google’s Consent Mode on their e-commerce websites. This feature helps align data collection behavior with user consent preferences, supporting privacy-conscious implementations while maintaining access to essential analytics and advertising functionalities.
Check the official document of Google Consent Mode V2 setup for more detailed information.
Basic Consent Mode
Basic Consent Mode is a simplified implementation of Google Consent Mode v2. It focuses on ensuring that data collection does not occur before the user has actively provided consent via a cookie banner.
With Consentik, implementing Basic Consent Mode is straightforward:
- Code Integration: Copy the code snippet generated by Consentik and paste it immediately after the
<head>tag in your website’s file. This ensures Google Consent Mode initializes before other tracking services. - Default State: Initially, all Google Consent Mode parameters (e.g.,
ad_storage, analytics_storage, ad_user_data, ad_personalization) are set to “denied.” No data is collected until the user provides consent. - Post-Consent Behavior: Once the user accepts via Consentik’s cookie banner, the parameters update to “granted” based on the selected cookie categories (e.g., marketing or analytics cookies). Google tags then load and begin collecting data as permitted.
This mode is ideal for smaller businesses or websites prioritizing simplicity and strict compliance without needing advanced features.
Advanced Consent Mode
Advanced Consent Mode extends the capabilities of Google Consent Mode V2, allowing more detailed data collection while still respecting user consent choices. Unlike Basic Consent Mode, this mode enables Google tags to load immediately upon a user’s website visit—even before consent is provided—though with strict limitations on the data collected.
Consentik supports Advanced Consent Mode as follows:
- Code Integration: Similar to Basic Consent Mode, paste the Consentik-generated code snippet into file right after the
<head>tag. However, in Advanced Consent Mode, the code is configured to allow Google tags to send “cookieless pings” from the outset. - Default State: Initially, parameters like
ad_storage, analytics_storage, ad_user_data, and ad_personalizationare set to “denied.” During this phase, Google collects only basic, anonymized data to simulate user behavior without relying on cookies or personal identifiers. - Post-Consent Updates: When the user accepts the cookie banner, Consentik updates the parameters to “granted” based on their chosen categories. At this point, Google tags transition to full data collection mode, utilizing cookies and identifiers for detailed analytics and advertising insights.
Advanced Mode is recommended for merchants who seek to maintain some level of data insight even before explicit consent is provided, while still aligning with user preferences and regulatory guidance.
You can configure Google Consent Mode directly from app’s admin: Google Consent Mode V2 page by following these steps:
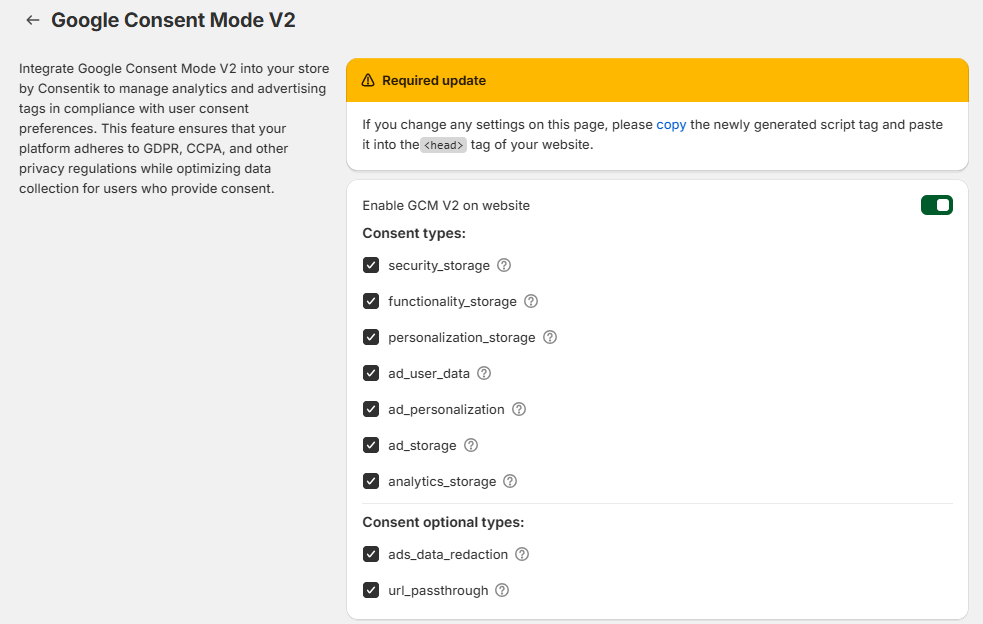
Consent Parameters Selection: Choose from the list of consent parameters which ones to apply. Options include:
ad_storage: Enables storage related to security such as authentication functionality, fraud prevention, and other user protection.ad_user_data: Sets consent for sending user data related to advertising to Google.ad_personalization: Sets consent for personalized advertising.analytics_storage: Enables storage (such as cookies) related to analytics e.g. visit duration.security_storage: Enables storage related to security such as authentication functionality, fraud prevention, and other user protection.functionality_storage: Enables storage that supports the functionality of the website or app e.g. language settings.personalization_storage: Enables storage related to personalization e.g. video recommendations.ads_data_redaction: When ad_storage is denied, new cookies will not be set for advertising purposes. Additionally, third-party cookies previously set on google.com and doubleclick.net will not be used except for spam and fraud purposes. Data sent to Google will still include the full page URL, including any ad click information in the URL parameters.url_passthrough: Passing ad click, client ID, and session ID information in URLs.
Based on the merchant’s selection, the app will generate the necessary code snippets. These snippets are designed to be compatible with Consent Mode v1 and v2, adhering to the latest updates as outlined in Google’s documentation.
Once the relevant options are selected and the code is generated, merchants can integrate Consent Mode by following these steps:
- Code Copying: Copy the generated code snippet provided by the app.
- Theme File Editing: Access the
index.htmlfile within the website’s code editor. - Code Pasting: Paste the copied code snippet just after the opening
<head>tag. - Save Changes: Save the changes made to ensure Consent Mode is active.
Default Consent Configuration
Upon integration of the generated code into the index.html file, the app will default all Google Consent Mode parameters to a ‘denied’ state. This ensures that no data is collected without the explicit consent of the user.
User Consent Interaction
When a user visits the merchant’s website, they will be prompted to provide consent for various categories of cookies, including:
- Advertising Cookies: Related to advertising and marketing efforts.
- Analytics Cookies: Used for collecting data on user interaction and behavior.
- Functionality Cookies: Essential for certain website features and personalization.
Updating Consent Status
If the user provides their consent:
- Consent Update: The app will update Google Consent Mode to ‘granted’ for the cookie categories the user has accepted.
- Consent Storage: The user’s preferences are stored in a cookie on their device, ensuring that their choices are remembered for future visits.
- Automatic Consent Application: On subsequent visits, the app will automatically read the stored cookie and apply the user’s preferences without requiring them to consent again.
Test your Consent mode setup
Method 1: Using Tag Assistant
If you go to https://tagassistant.google.com/, you can debug the consent states for any sites running Google Tags.
After adding the domain that you want to debug, you can choose a Tag ID from the top of Tag Assistant, then choose the first Consent event from the navigation on the left, and select the “Consent” tab to see default value of consent, all of consent types are denied:

Come back to your website and click to “Accept” button and you can see another consent event is fired. Click to Consent Tab and see the update event

If you see a warning that “a tag read consent before a default was set”, it means you have a race condition where your consent states are not established in time before any tags that reference them have time to fire.
Method 2: Using Console on DevTool
- Open your site
- Press button F12 or
Ctrl + Shift + Jon Windows (Cmd + Option + Jon MacOS) or Right Mouse and select Inspect to open Console Tab on - Type
dataLayer - When cookie banner show, you can see the default consent event is fired

5. When you click to “Accept” button, you can see an Update event is fired