Did you know statistics show that companies failing to comply with GDPR can face fines of up to €20 million or 4% of global revenue? With global data privacy laws like GDPR and CCPA tightening, ensuring your Shopify store is compliant is no longer optional—it’s crucial. Enter Consent Mode v2 on Shopify, a powerful tool that adapts data collection to user consent preferences. This comprehensive guide will show you how to leverage Consent Mode v2 to not only comply with regulations but also enhance user experience and data accuracy. Stay ahead with the right tools.
What is Google Consent Mode V2?
Google Consent Mode V2 (GCM V2) is a tool designed by Google to help website owners, including Shopify merchants, manage user consent for cookies and data collection. This tool ensures that your visitors’ privacy choices are respected while still enabling you to collect essential data for optimizing your online store.
GCM V2 provides a flexible system that adjusts Google services on your website according to each visitor’s consent preferences. Depending on what users agree to, GCM V2 modifies how data is collected and processed, helping you stay compliant with global data protection laws like GDPR.
Plus, Google Consent Mode V2 integrates seamlessly with Google Ads, Analytics, and Tag Manager, allowing you to effectively manage marketing campaigns, analyze performance, and use tracking tags—all while respecting user consent.
Why Do You Need Consent Mode v2 for your Shopify Stores?
As privacy regulations tighten and consumers become more aware of how their data is used, integrating Consent Mode v2 into your Shopify e-commerce stores is not just a smart move—it’s essential. Here’s why:
Compliance with Data Regulations
With regulations like GDPR in Europe and CCPA in California, businesses are required to manage user data carefully. Google Consent Mode v2 helps you stay compliant by ensuring that user data is collected only when consent is given. This reduces the risk of hefty fines and builds trust with your customers.
For example, if you run an online store in Europe, GDPR mandates user consent before data collection. Google Consent Mode v2 allows you to show a consent banner, ensuring data is collected only when consent is given. This helps you avoid fines and build customer trust.
Improved User Experience
Nobody likes to be bombarded with cookie banners or pop-ups. Google Consent Mode v2 streamlines the consent process, offering a smoother experience for users. It allows you to customize consent prompts to be less intrusive, while still collecting essential data.
With Consent Mode v2, you can create a small, non-intrusive consent banner that blends into the Shopify site, allowing users to continue browsing smoothly. This approach makes it more likely they’ll stay engaged with your content.
Enhanced Data Accuracy
When users deny consent, traditional tracking tools may lose valuable data, leading to gaps in your analytics. However, with Google Consent Mode v2, you can still gather anonymized data even if the user has opted out of tracking. This means you can maintain accurate insights without compromising user privacy.
Imagine if a user visits your site and opts out of tracking, traditional tools might stop collecting any data from that session, leading to gaps in your analytics. With Consent Mode v2, you can still gather anonymized data, such as how long the user stayed on your site or which pages they viewed. This allows you to keep your analytics accurate without breaching the user’s privacy.
Adapt to Changing Consumer Expectations
Today’s consumers are more informed and selective about how their data is used. They expect transparency and control over their online experience. By integrating Google Consent Mode v2 on Shopify, you’re showing your customers that you respect their privacy and commit to protecting their data. This can set you apart from competitors and strengthen your brand’s reputation.
Gain Insights into Consent Behavior
Consent Mode v2 doesn’t just help you comply with regulations—it also provides valuable insights into how your customers interact with consent prompts. You can track how many users accept or decline consent, which can inform how you design and implement future consent strategies. Understanding these behaviors can help you optimize your consent process, making it easier to gather the data you need while minimizing disruptions to the user experience.
How to Integrate Google Consent Mode v2 on Shopify?
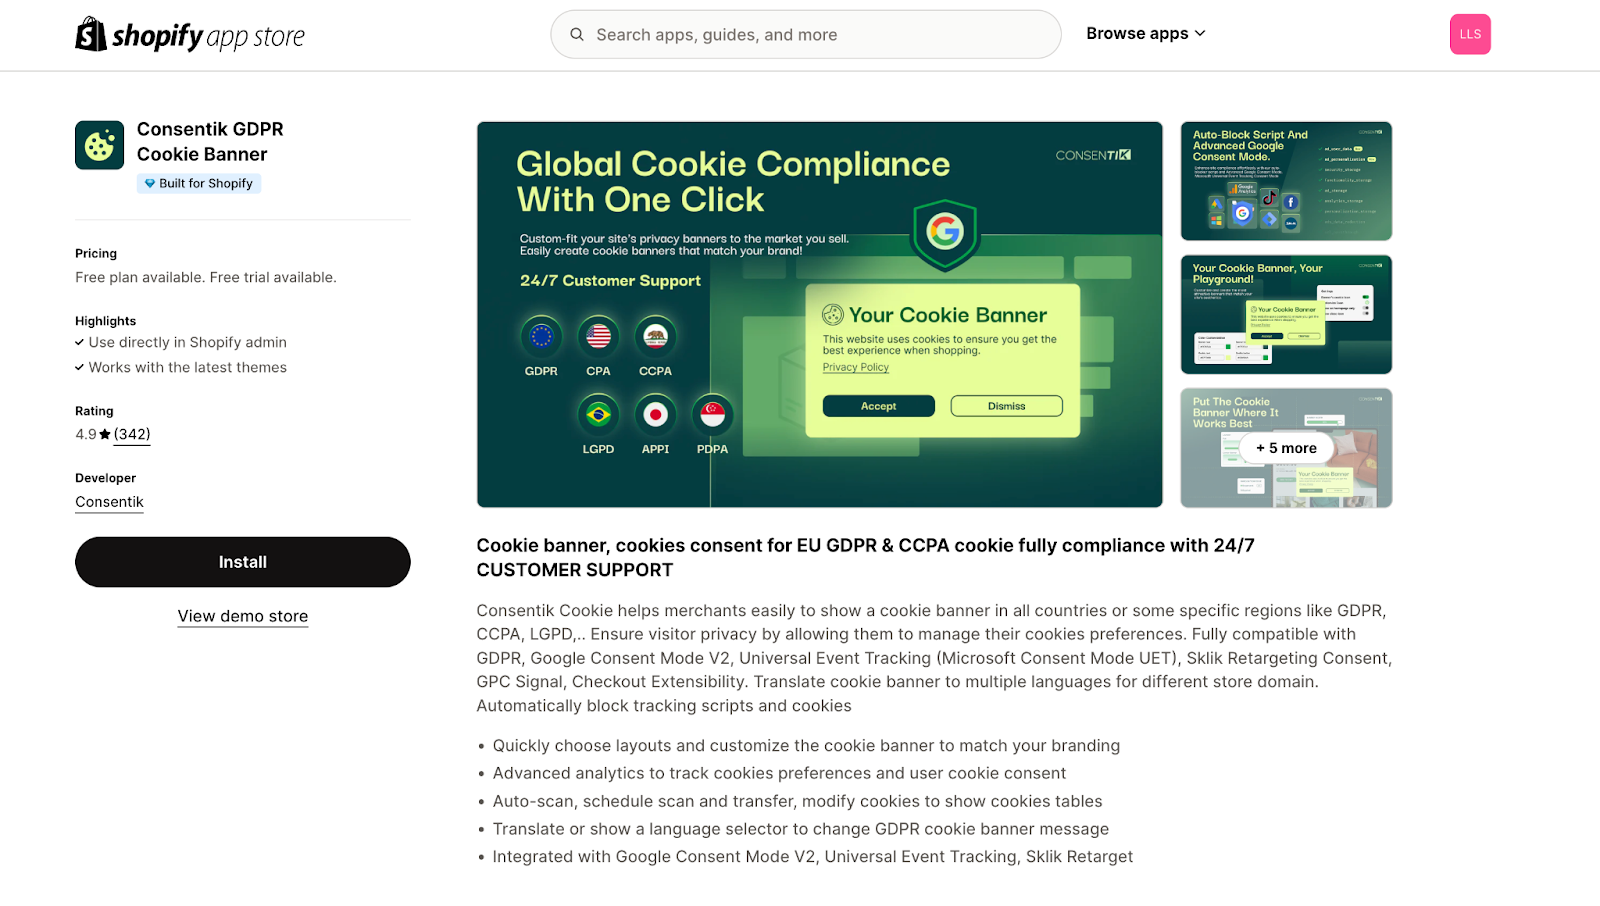
Integrating Consent Mode v2 with your Shopify store is a straightforward process, especially with the help of useful tools like the Consentik. Here’s how you can configure and activate Consent Mode directly from your Shopify admin dashboard with Consentik:
Step 1: Configure Consent Parameters
First, you need to install the Consentik GDPR Cookie Banner on Shopify App Stores.
After that, begin by navigating to Settings > Integration > Google Consent Mode within the Consentik app’s admin panel. Here, you’ll be presented with a list of consent parameters. Select the ones that are most relevant to your business:
-
- ad_storage: Manages storage related to security, including authentication and fraud prevention.
-
- ad_user_data: Controls consent for sending user data related to advertising to Google.
-
- ad_personalization: Manages consent for personalized advertising.
-
- analytics_storage: Enables storage for analytics purposes, such as tracking visit duration.
-
- security_storage: Handles storage related to security features.
-
- functionality_storage: Manages storage that supports site functionality, like language settings.
-
- personalization_storage: Enables storage for personalization, such as video recommendations.
-
- ads_data_redaction: Ensures that new cookies for advertising aren’t set when ad_storage is denied, while still allowing for data related to security and fraud prevention.
-
- url_passthrough: Allows ad click, client ID, and session ID information to be passed through URLs.
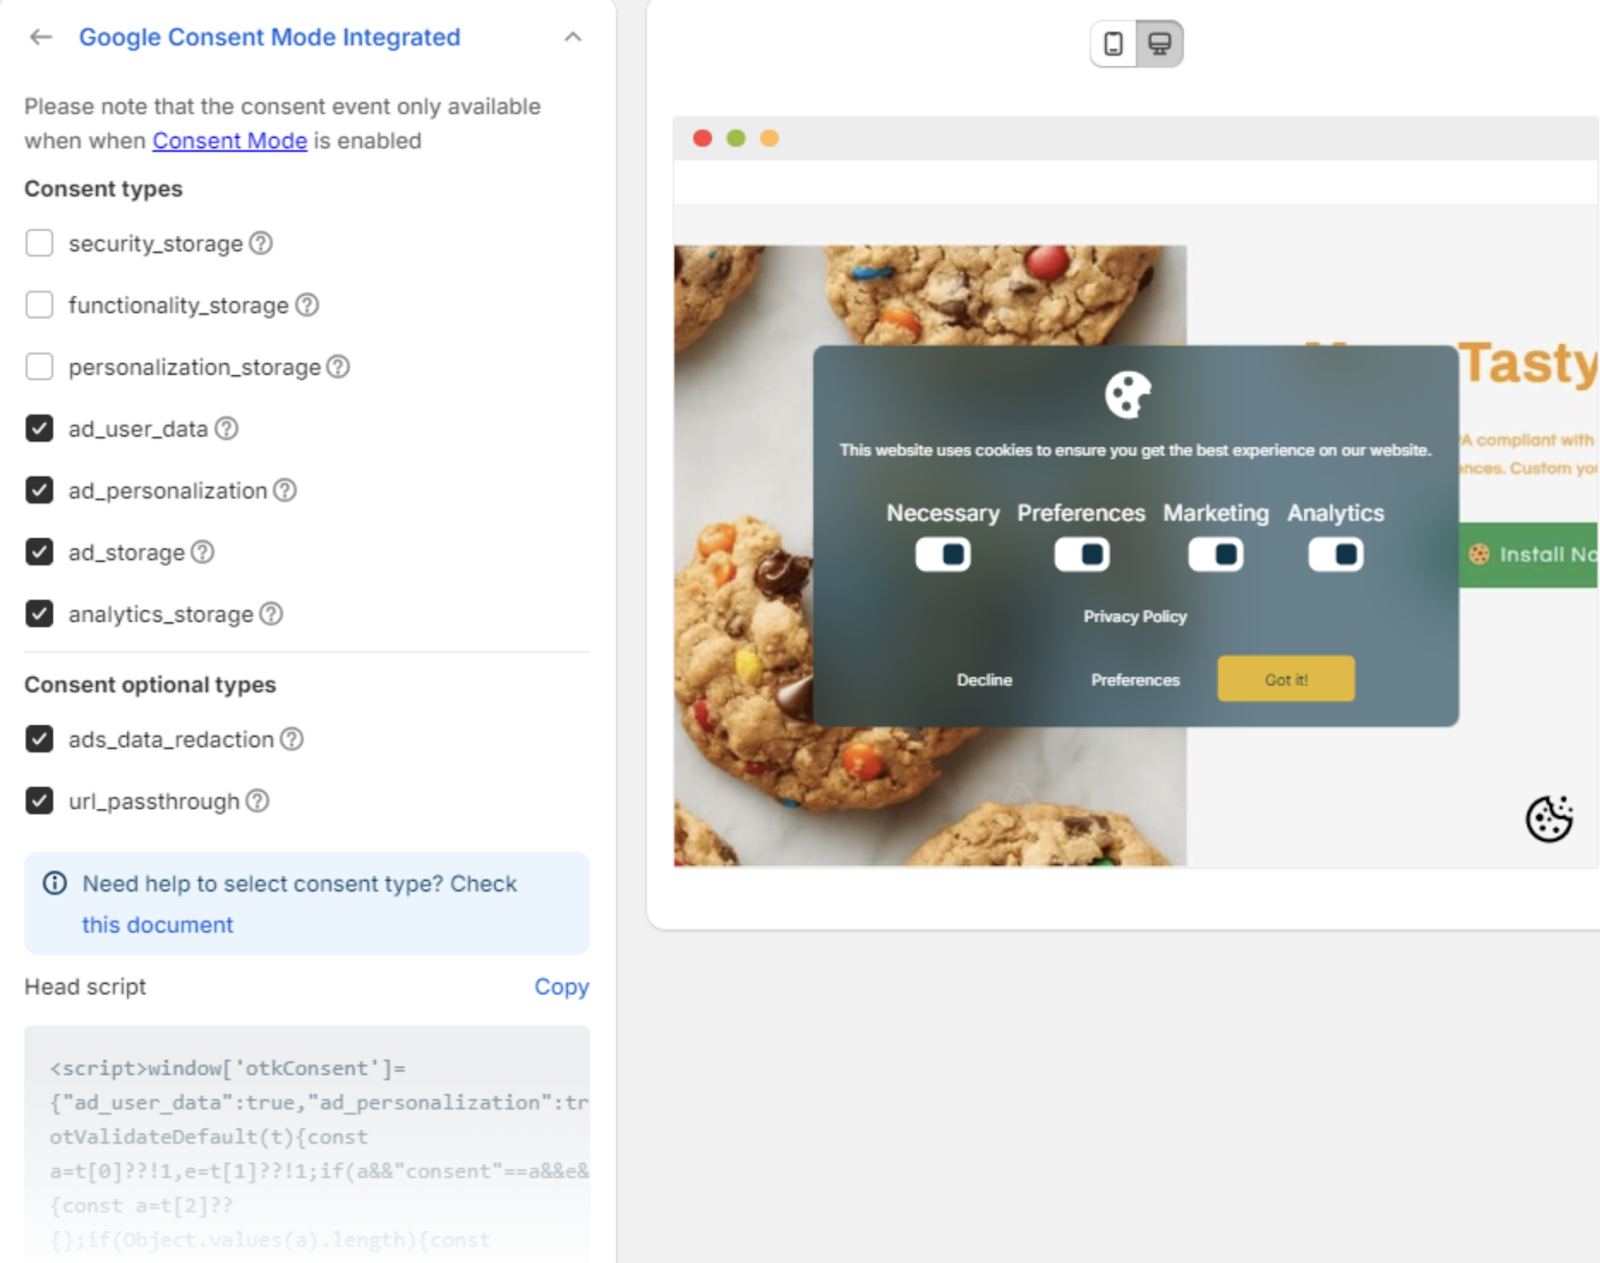
Once you’ve selected the appropriate parameters, the app will automatically generate the necessary code snippets. These snippets are compatible with both Consent Mode v1 and v2, ensuring you adhere to the latest Google updates.
Step 2: Implement the Generated Code
After configuring the consent parameters, follow these steps to integrate the code into your Shopify store:
-
- Copy the Code: Take the generated code snippet provided by the Consentik app.
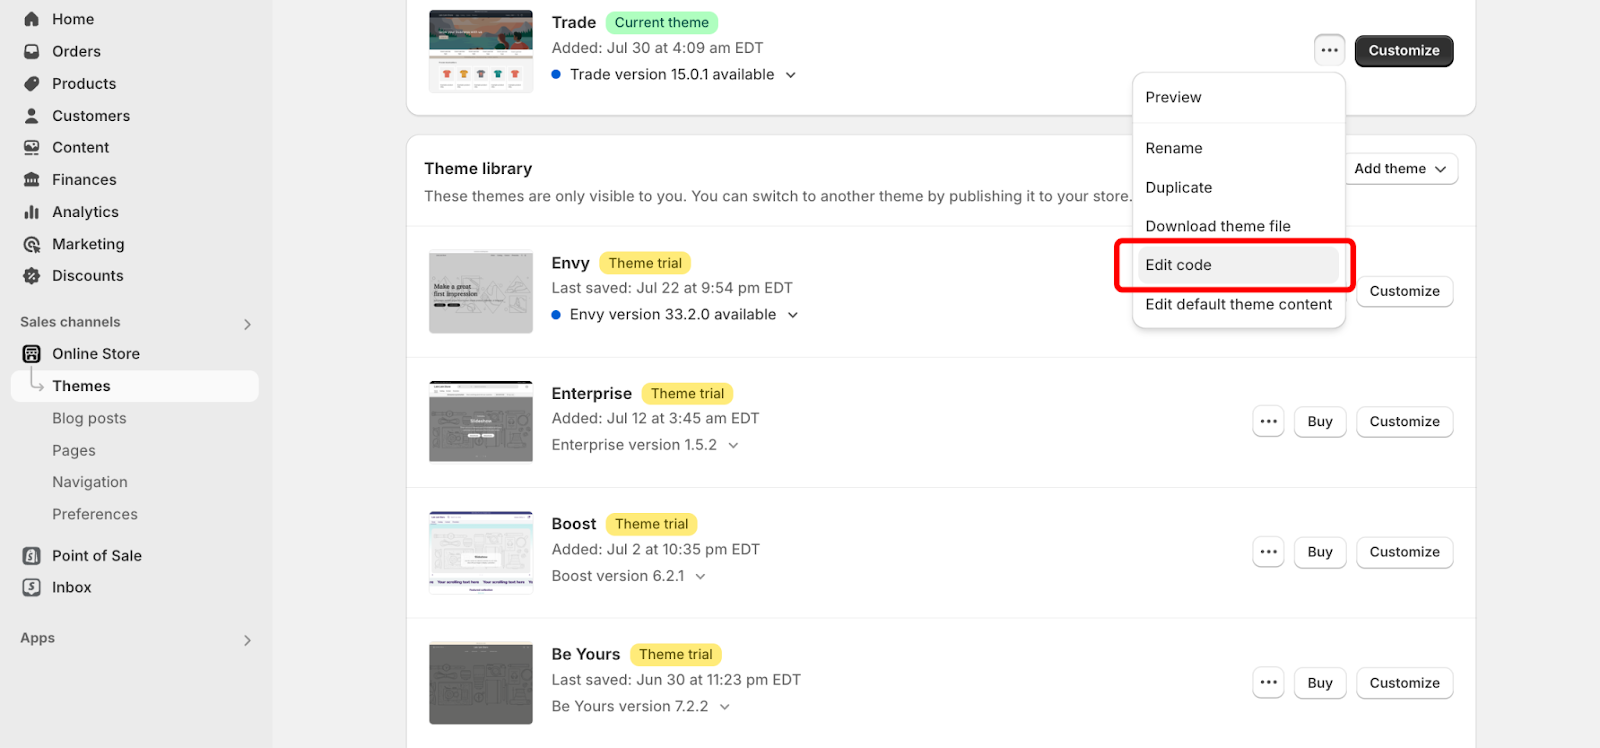
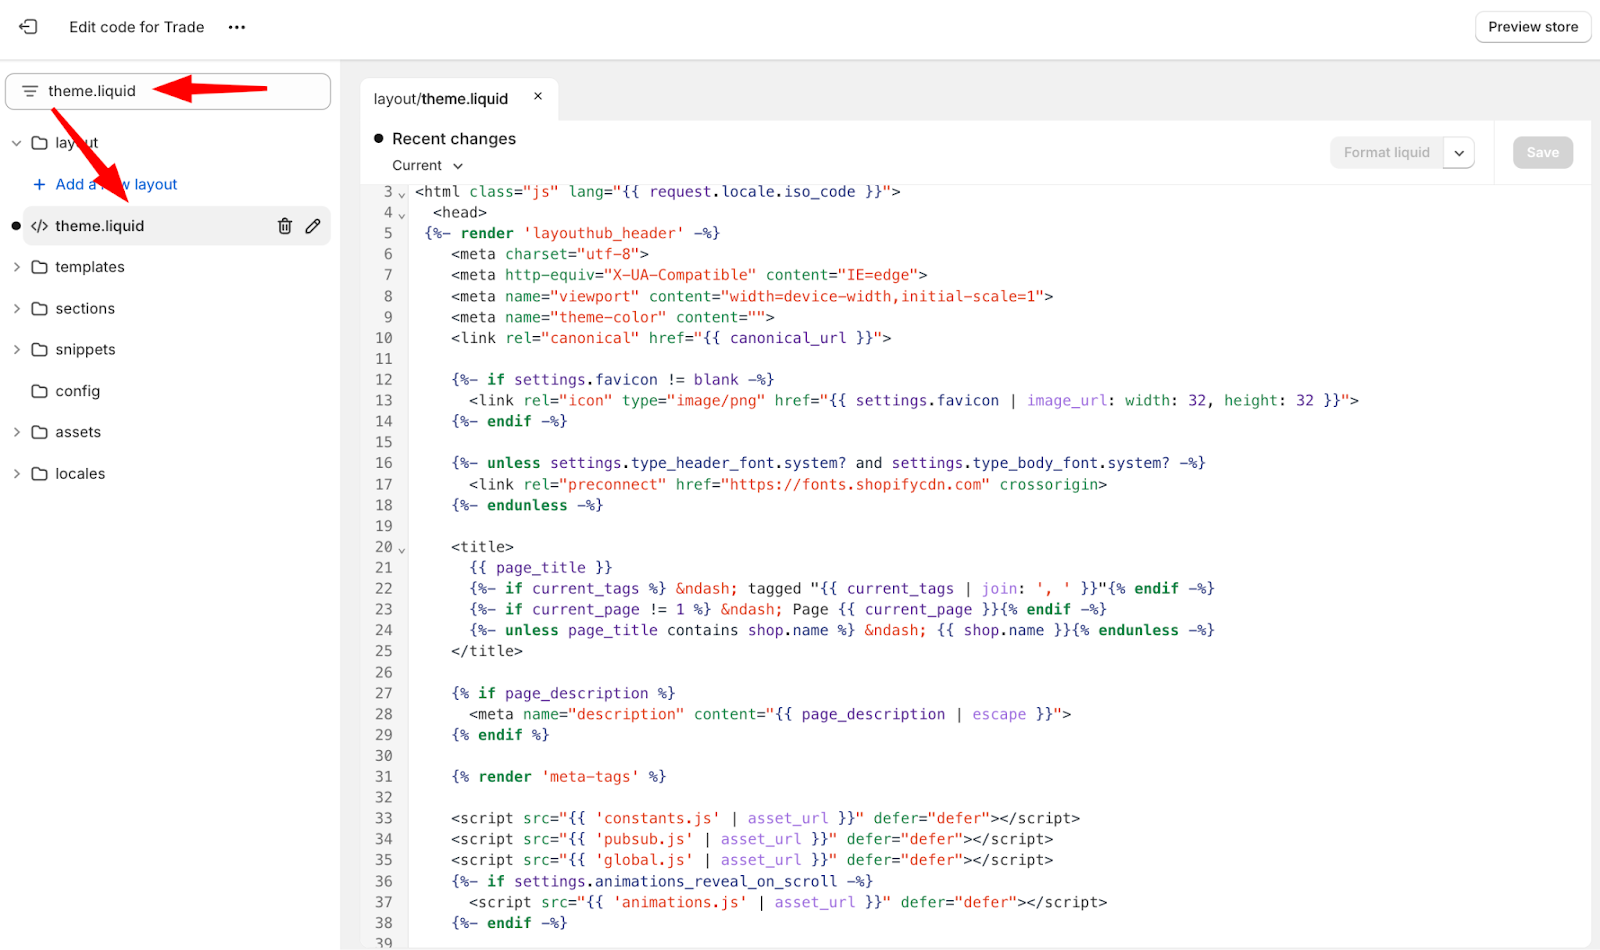
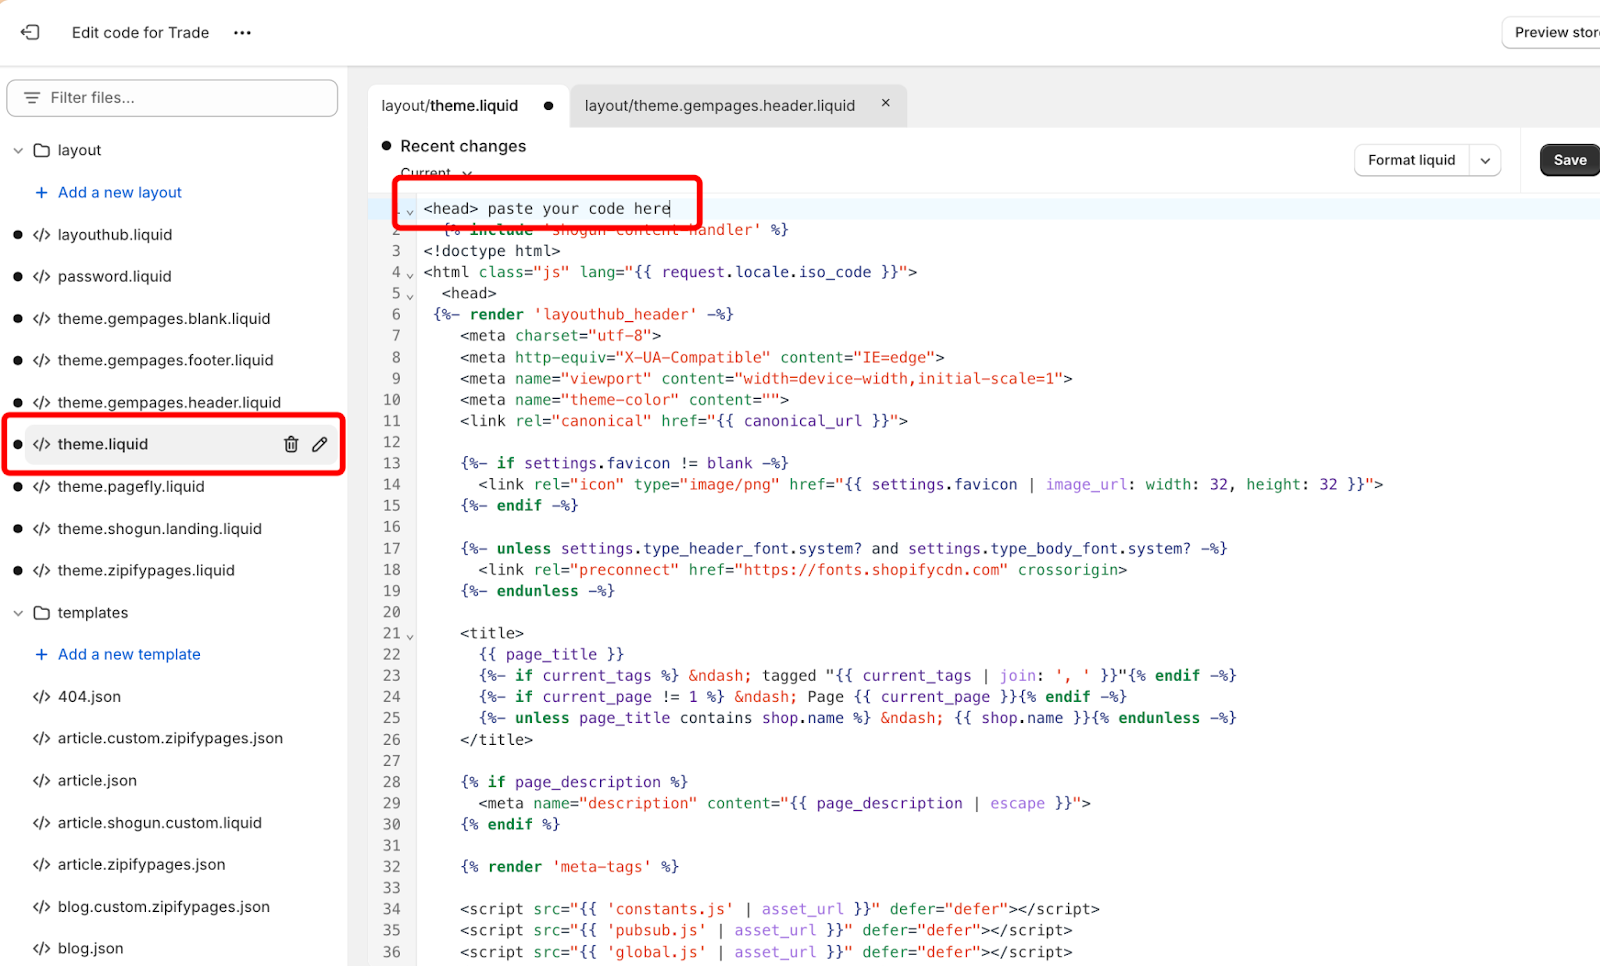
- Edit Your Theme File: Access your Shopify store’s theme.liquid file by going to Online Store>Your theme> Edit code> Search for the theme.liquid file.
-
- Paste the Code: Insert the copied code snippet just after the opening <head> tag in the theme.liquid file.
-
- Save Changes: Save your changes to activate Google Consent Mode on your site.
By default, all Google Consent Mode parameters will be set to ‘denied’, ensuring no data collection occurs without explicit user consent.
Step 3: Manage User Consent Interaction
When a user visits your Shopify store, they will be prompted to provide consent for various cookie categories, including:
-
- Marketing Cookies: For advertising and marketing purposes.
-
- Analytics Cookies: These are used to track user interaction and behavior.
-
- Preferences Cookies: Essential for site features and personalization.
If a user agrees to provide their consent, here is what will happen:
-
- Consent Given: Consentik will update Google Consent Mode to ‘granted’ for the cookies they accepted.
-
- Consent Stored: The user’s choices are saved in a cookie on their device, so they don’t have to set them again later.
-
- Automatic Consent: On future visits, the app will automatically apply the user’s saved preferences without asking again.
With Consentik, managing user consent becomes simple and compliant with privacy regulations, while also minimizing the impact on essential data collection.
Step 4: Test and Launch
Before you go live, it’s essential to test the integration to ensure everything is functioning as expected. With Consentik, you have 2 reliable methods to check if your Consent Mode is correctly implemented:
Method 1: Using Google Tag Assistant
-
- Visit Google Tag Assistant: Go to Google Tag Assistant, where you can debug the consent states for any site running Google Tags.
- Add Your Domain: Enter the domain of the site you want to debug.
- Select Tag ID: From the top of Tag Assistant, choose the Tag ID relevant to your site.
-
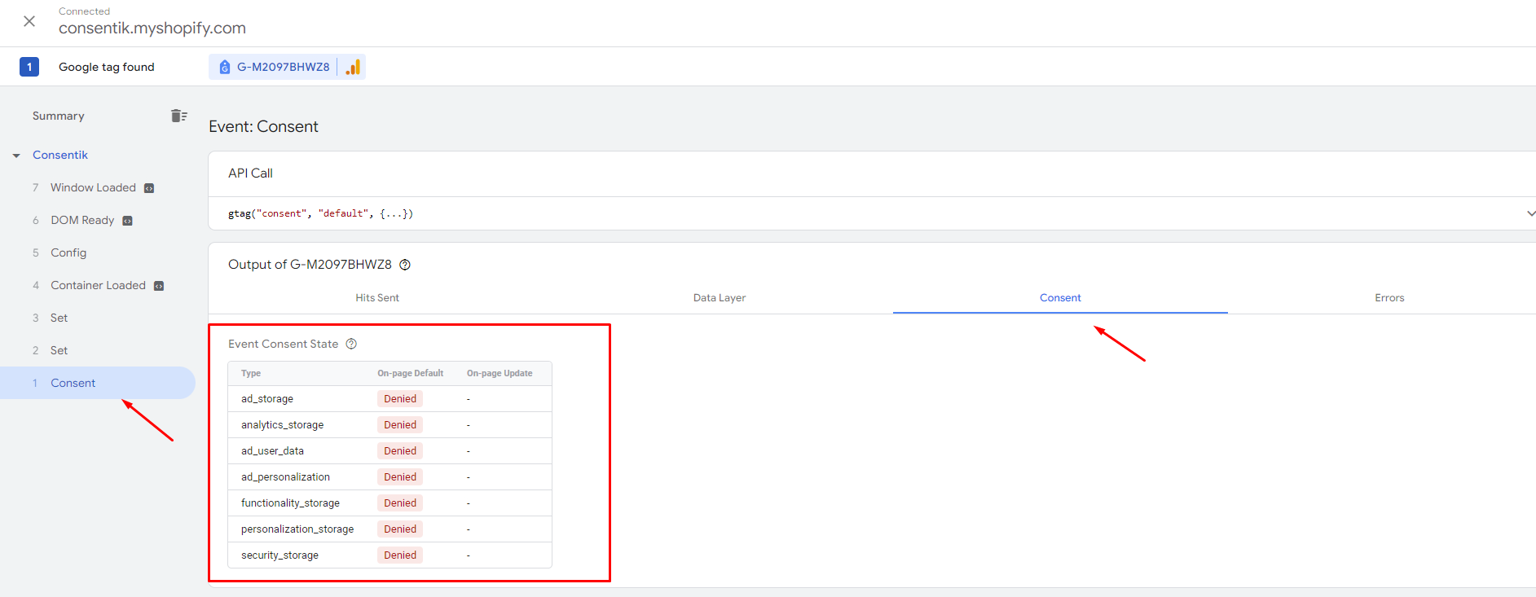
- Check Consent Events: In the navigation on the left, select the first Consent event and click the “Consent” tab to view the default consent settings. Initially, all consent types should be set to ‘denied’.
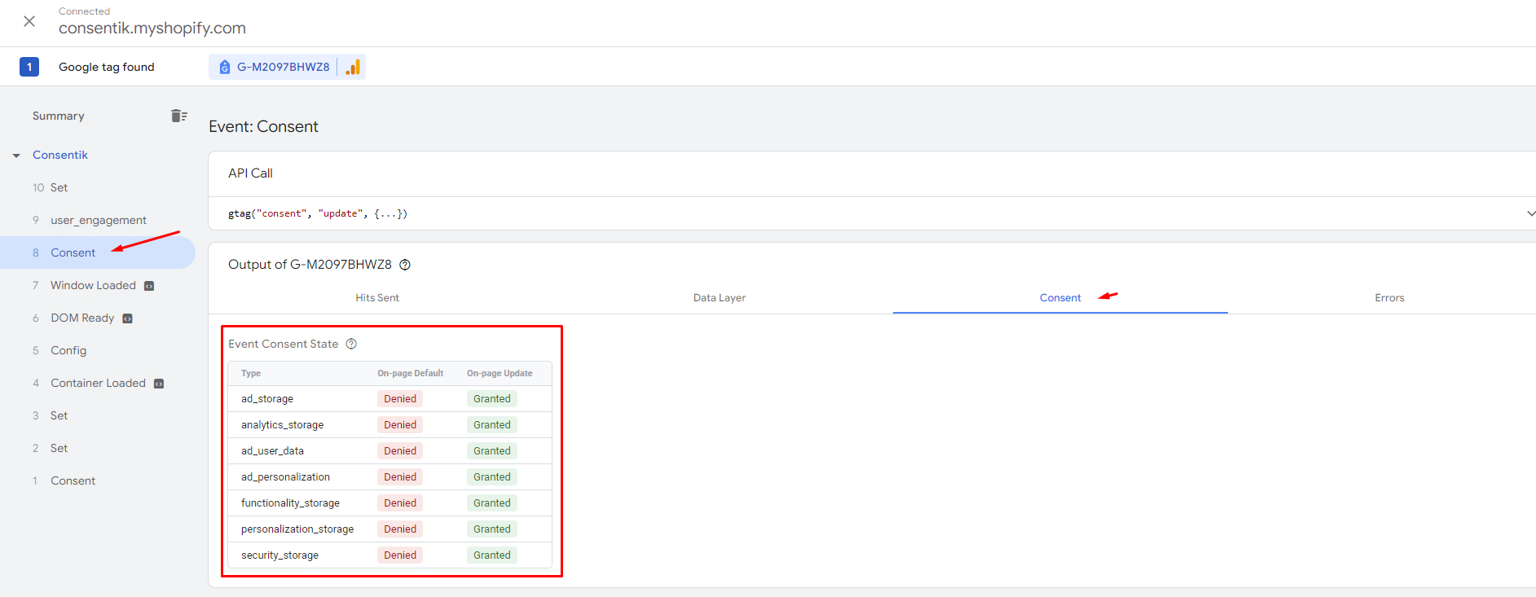
- Verify the Update: Return to your website and click the “Accept” button on your consent banner. This action should trigger a new consent event. Go back to Tag Assistant, check the Consent tab again, and confirm that the consent states have been updated accordingly.
-
- Watch for Warnings: If you see a warning stating, “a tag read consent before a default was set,” this indicates a race condition. This means your consent states weren’t established in time, so ensure the consent states are set up before any tags fire.
Method 2: Using Console on DevTools
-
- Open Your Website: Start by loading your website in a browser.
- Open DevTools Console: Press F12 or Ctrl + Shift + J on Windows, or Cmd + Option + J on MacOS. Alternatively, right-click on the page and select “Inspect” to open the DevTools console.
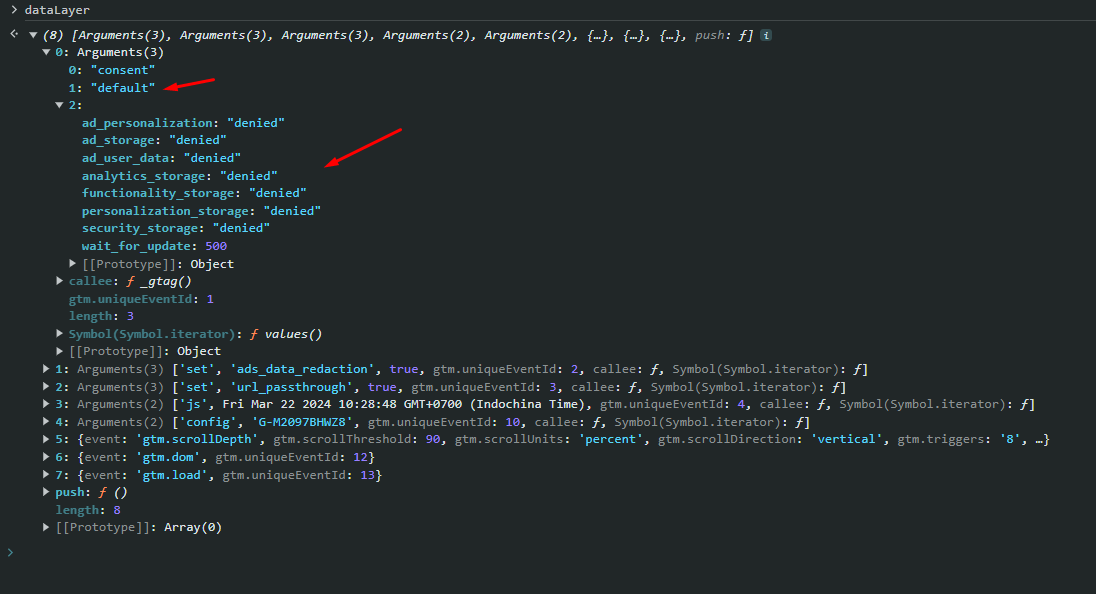
- Type dataLayer: In the Console tab, type dataLayer to monitor the data layer events.
- Observe the Default Consent Event: When the cookie banner appears, you should see the default consent event being fired in the console.
-
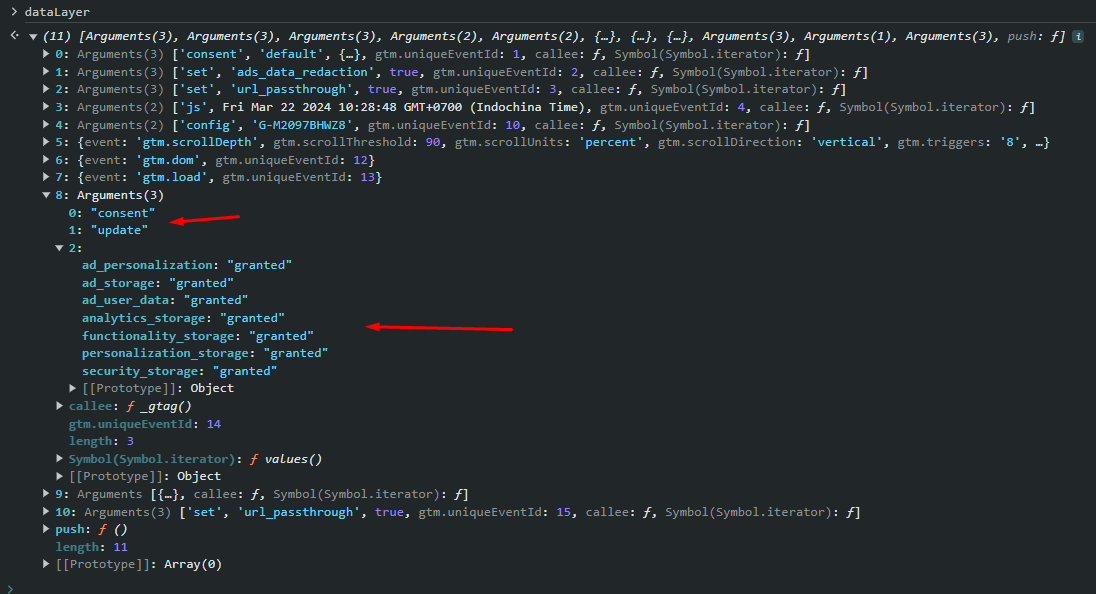
- Verify the Update Event: Click the “Accept” button on the banner, and you’ll notice an Update event being triggered in the console. This confirms that the consent states have been updated.
Which Method Should You Use? Both methods are effective, but the choice depends on your preference and familiarity with the tools.
-
- Google Tag Assistant is more visual and provides a clear interface for tracking consent events, making it ideal if you prefer a straightforward, guided approach.
-
- DevTools Console offers a more hands-on and detailed view, ideal for those who are comfortable with browser developer tools and want to see the exact data layer events as they occur.
For ease of use, I recommend Google Tag Assistant, especially if you’re new to debugging or prefer a more user-friendly interface. Once you’re confident that everything is working as expected, you’re ready to launch your new consent system with Consentik GDPR Cookie Banner!
>>> Learn More: 5 Simple Ways to Check Google Consent Mode V2 Status
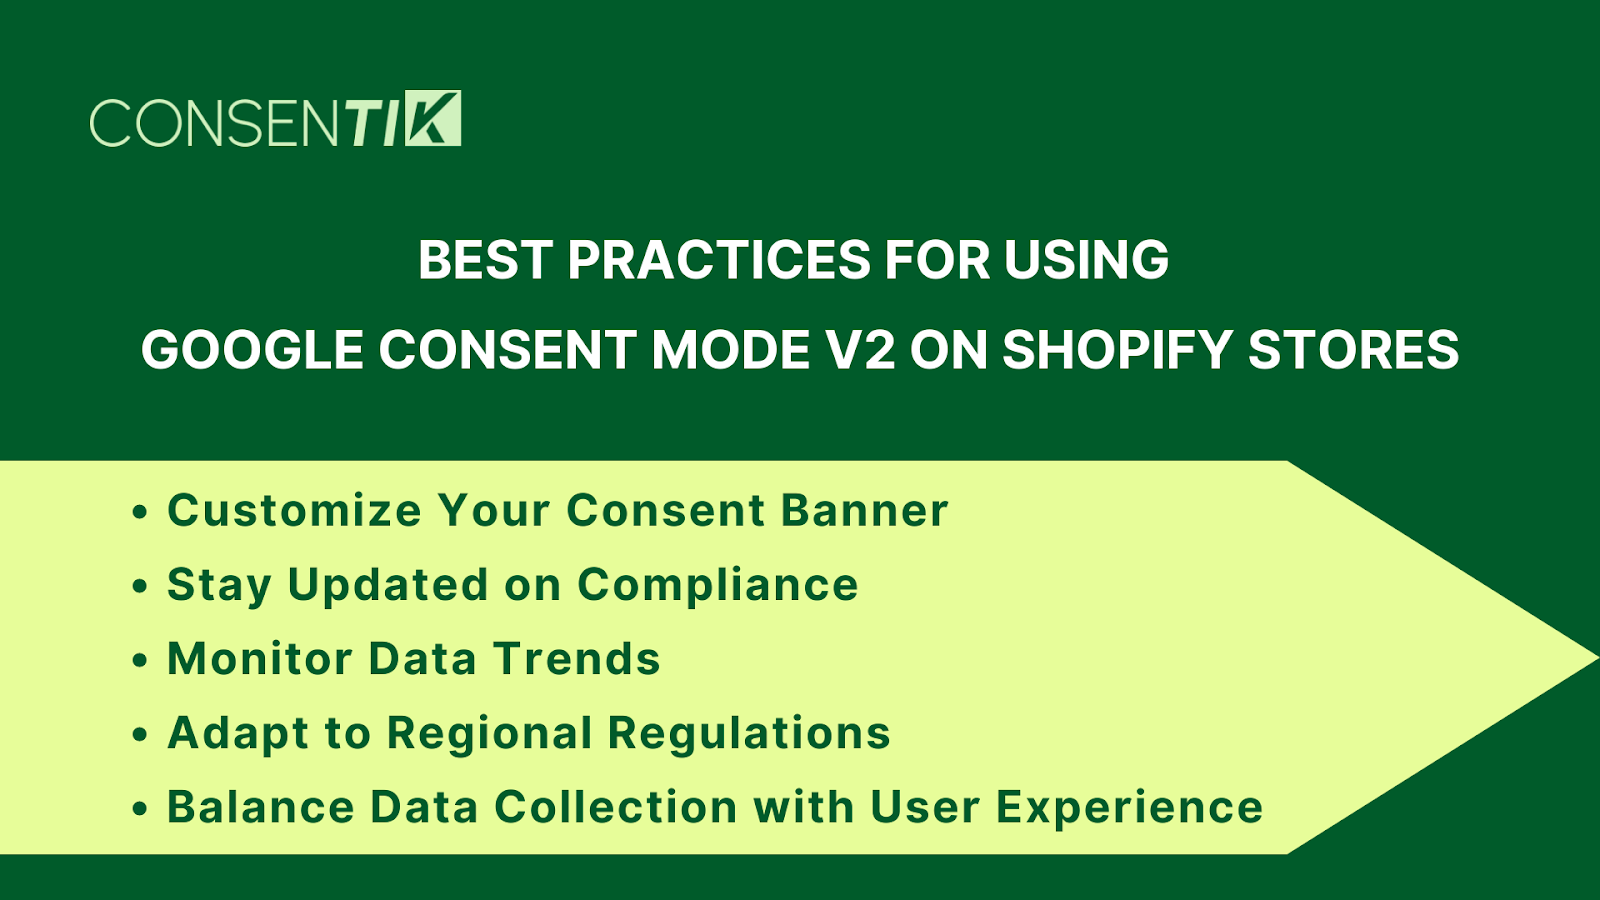
Best Practices for Using Google Consent Mode v2 on Shopify Stores
To maximize the benefits of Google Consent Mode v2 with Shopify, it’s essential to follow best practices while being mindful of potential challenges. Here’s how you can effectively implement and manage Consent Mode on your Shopify store:
Customize Your Consent Banner
Make your consent banner visually appealing and aligned with your brand. Use your brand’s colors, logo, and tone of voice to create a banner that builds trust and encourages user engagement. A well-designed banner can reduce the likelihood of users opting out.
Stay Updated on Compliance
Data privacy laws like GDPR and CCPA change frequently. Regularly review and update your consent settings to ensure compliance. Stay informed about the latest legal requirements, and consider consulting a data privacy expert to keep your practices up-to-date.
Tip: Schedule quarterly reviews of your consent settings to ensure they comply with the latest regulations. This proactive approach can help avoid legal issues.
Monitor Data Trends
Track how users interact with your consent prompts. If you notice a decline in data collection, it may be due to confusing or off-putting consent banners. Simplify your forms or provide clearer explanations to improve user engagement.
Tip: Use A/B testing to experiment with different banner designs and messages. This can help you determine which version resonates best with your audience.
Adapt to Regional Regulations
Different regions have different data regulations, such as GDPR in Europe and CCPA in California. Customize your consent practices based on the user’s location by using geo-targeted consent banners that meet each region’s specific legal requirements.
Balance Data Collection with User Experience
Keep your consent process simple and user-friendly. Avoid overwhelming users with too many options or complicated language. For example, group cookies into categories like “Essential,” “Analytics,” and “Marketing,” with brief explanations. This approach makes it easier for users to understand their choices without compromising the information you collect.
Common Challenges and How to Overcome Them
While setting up Consent Mode v2 is relatively straightforward, there can be some challenges:
-
- Ensuring Full Compliance: Regulations differ from region to region, making full compliance challenging. To stay compliant, keep up with the latest laws and update your consent practices as needed. Consulting with a legal expert can also help ensure your business meets all legal requirements.
-
- Balancing Data Collection with User Experience: Finding the right balance between gathering important data and maintaining a good user experience is key. Don’t overwhelm users with too many options or complicated consent forms. Focus on making the process clear and straightforward.
FAQ
1. How to Activate Google Consent Mode v2 on Shopify?
To activate Google Consent Mode v2 on Shopify, follow these steps:
-
- Install a Consent Management App: First, install a GDPR-compliant cookie banner app, such as Consentik, from the Shopify App Store.
- Configure Consent Parameters: Navigate to the app’s admin settings, then go to Settings > Integration > Google Consent Mode. Select the consent parameters that are relevant to your business.
- Generate Code Snippet: The app will generate a code snippet based on your selected parameters.
- Add the Code to Your Theme: Copy the generated code and paste it into the theme.liquid file of your Shopify store, just after the opening <head> tag.
- Save Changes: Save the changes to activate Consent Mode on your site.
2. What is Consent Mode v2?
Consent Mode v2 is a tool by Google that adjusts data collection based on user consent, ensuring compliance with privacy laws like GDPR.
3. How to Check if Consent Mode v2 is Enabled?
There are 2 ways to check if Consent Mode v2 is enabled, which are using Google Tag Assistant to check for consent events. And using the DevTools console (F12), and typing dataLayer to see consent-related events.
4. Where is Shopify Data Stored?
Shopify data is primarily stored in data centers in the United States, with additional centers globally for redundancy and compliance.
Conclusion
Google Consent Mode v2 is a powerful tool that helps you navigate the complex world of data privacy with ease. By integrating this feature into your Shopify store, you can ensure compliance with regulations, maintain accurate data, and provide a better user experience. Whether you’re just starting or looking to enhance your current setup, Google Consent Mode v2 on Shopify is a must-have for any modern e-commerce business.